
소개
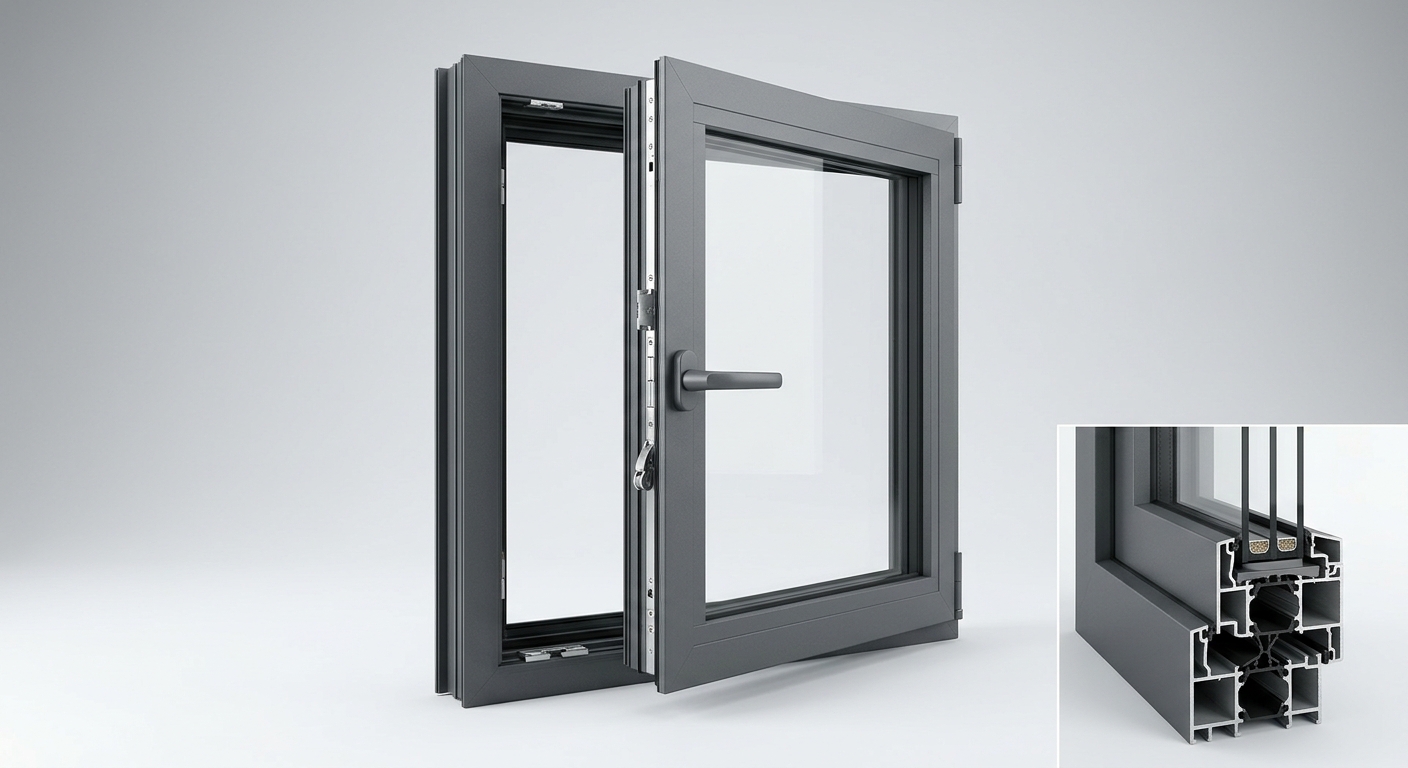
For procurement managers, building contractors, and facility maintenance teams, an integrated casement window with poor sealing performance can lead to more than indoor discomfort. Air leakage may reduce energy efficiency, increase condensation risks, and create additional maintenance costs if the issue is ignored. Unlike conventional window systems, integrated casement windows rely on multiple components — including multi-chamber profiles, multi-point locking hardware, and compression gaskets — working together to maintain airtight performance. A small issue, such as sash misalignment or gasket wear, can affect the overall sealing effectiveness.
This guide explains how to identify common causes of integrated casement window seal failure, diagnose leakage problems, and apply practical repair solutions. It also helps contractors and procurement teams evaluate whether repairing existing windows or replacing the system is the more cost-effective choice. By following a structured inspection and maintenance approach, you can improve window performance, reduce long-term service costs, and maintain required air permeability standards.
1. Why Do Integrated Casement Windows Fail to Seal?
1.1 Common Causes of Integrated Casement Window Seal Failure
Seal problems in an integrated casement window usually result from a combination of factors rather than a single defect. In most cases, the main causes include gasket deterioration, sash-to-frame alignment issues, and hardware wear.
- Gasket aging:
EPDM and TPE compression gaskets are designed to provide long-term sealing performance, but their effectiveness can decline over time due to UV exposure, temperature changes, and repeated compression. In harsh environments, such as coastal areas or highly exposed building facades, gaskets may harden or lose elasticity earlier than expected. Once the gasket can no longer recover its original shape, it may fail to maintain consistent contact with the frame, allowing air leakage. - Sash-to-frame gap deviation:
Proper sealing depends on precise alignment between the sash and frame. Although window profiles are manufactured within strict tolerances, installation errors, building movement, or long-term structural settlement can increase the gap beyond the intended range. These uneven clearances often create leakage points around corners, hinge areas, or locking sides. - Hardware wear and misalignment:
Multi-point locking hardware helps distribute closing pressure evenly across the window frame. However, loose hinges, worn locking components, or shifted keep plates can reduce compression force in specific areas. Even minor hardware movement can prevent the sash from pressing evenly against the gasket, resulting in localized air leakage.
1.2 How Integrated Window Design Influences Sealing Performance
The advanced structure of integrated casement windows improves insulation, security, and overall performance, but it also makes seal issues more complex to diagnose. Unlike simpler window designs, integrated systems rely on multiple sealing layers working together, including an external weather seal, a drainage and pressure-control zone, and an internal air seal.
When one sealing layer becomes damaged or misaligned, the symptoms may appear elsewhere. For example, air leakage detected near the corner of a window may actually originate from a weakened gasket section or uneven sash compression rather than the visible location.
Thermal movement is another factor that can affect sealing consistency. Aluminum frames expand and contract with temperature changes, which may slightly alter sash positioning over time. In large window units or buildings exposed to significant seasonal temperature fluctuations, these small dimensional changes can contribute to intermittent sealing problems that are difficult to identify during a single inspection.
| Failure Type | Trigger Cause | Visible Symptom | Severity | DIY Repairable? |
|---|---|---|---|---|
| Gasket compression set | UV aging, thermal cycling | Gap visible when closed | Medium | Yes |
| Corner air leakage | Sash misalignment | Drafts at corners | 높음 | Partially |
| Hardware-driven gap | Loose hinge / lock point | Uneven sash closure | 높음 | Yes |
| Profile warping | Long-term load / heat | Visible bow in frame | Critical | No |
| Glazing bead seal failure | Improper installation | Condensation on glass edge | Medium | Yes |
2. How to Diagnose Integrated Casement Window Seal Problems Step by Step
2.1 Visual Inspection Checklist Before Testing
Before using professional testing equipment, start with a detailed visual and physical inspection. Many integrated casement window seal failures can be identified through basic checks if the inspection is performed systematically.
1. Check the sash-to-frame gap
Close the window completely and inspect the gap between the sash and frame from the interior side. Visible light around the perimeter usually indicates a sealing issue, such as poor alignment, insufficient gasket compression, or hardware adjustment problems.
2. Inspect gasket condition and continuity
Examine the gasket along all four corners and edges. Pay close attention to signs of deterioration, including cracks, deformation, separation at corner joints, or areas where the gasket remains compressed and does not recover its original shape.
3. Verify gasket compression consistency
After closing the window, open the sash and inspect the compression marks left on the gasket. A uniform compression pattern indicates balanced sealing pressure, while missing or uneven marks may suggest sash misalignment or inconsistent hardware adjustment.
4. Test hardware engagement
With the window closed, gently move the sash to check for excessive movement. Loose hinges, worn locking points, or incorrectly positioned keep plates can prevent the sash from maintaining even pressure against the gasket.
5. Inspect frame and sealant conditions
Check the frame corners and surrounding sealant for cracks, gaps, or signs of movement. These issues are more common on building elevations exposed to strong sunlight, temperature changes, or harsh weather conditions.
2.2 Tools and Methods for Detecting Air Leakage
After identifying possible problem areas through visual inspection, targeted testing can help confirm the actual source of leakage.
Smoke test
A smoke pencil or incense stick can be used as a simple field diagnostic tool. Hold the smoke source near suspected leakage points while the window is closed. Movement of the smoke indicates active air movement through the seal.
This method is inexpensive and useful for quickly locating leakage areas during routine inspections.
Pressure and airflow check
On a windy day, place your hand along the interior window perimeter to detect noticeable drafts. While this method cannot replace professional testing, it can help identify areas with obvious air infiltration.
Feeler gauge inspection
A feeler gauge can be used to check whether the sash-to-frame clearance remains consistent around the window. Uneven resistance or gaps may indicate improper sash alignment or insufficient gasket compression.
Professional air leakage testing
For commercial buildings or projects requiring documented performance data, a blower door test can measure air leakage under controlled pressure conditions. These results help verify whether the window system meets required air permeability standards, such as EN 12207 or AAMA performance requirements.
3. How to Fix Integrated Casement Window Seal Problems: Practical Repair Methods
3.1 Replacing or Adjusting Weatherstripping and Gaskets
Replacing worn gaskets is one of the most common solutions for integrated casement window seal failure. In many cases, this repair can be completed without specialized equipment, provided that the replacement gasket matches the original profile and compression requirements.
Step 1 — Select the correct gasket profile
Before replacing the gasket, identify the existing seal type and dimensions. Common profiles include D-shaped seals, P-shaped seals, and co-extruded bubble gaskets. The replacement gasket should match the original groove size to ensure proper compression.
An incorrect profile may create new problems: a gasket that is too thin may fail to seal effectively, while an oversized gasket may prevent the sash from closing properly.
Step 2 — Remove the damaged gasket and clean the channel
Carefully remove the old gasket from the frame groove. After removal, clean the channel to eliminate dust, residue, and old adhesive that may prevent the new gasket from seating correctly.
A clean installation surface helps maintain consistent contact between the gasket and frame.
Step 3 — Install the new gasket with proper compression
Install the replacement gasket evenly around the entire perimeter, paying special attention to corners and connection points. The gasket should compress enough to create a reliable seal while still allowing smooth window operation.
Avoid stretching the gasket during installation, as excessive tension may cause gaps to appear at corners over time.
Step 4 — Verify sealing performance after installation
After installation, close and reopen the window several times to confirm smooth operation. Check whether the gasket shows consistent contact marks around the entire frame.
Uneven compression usually indicates that additional sash adjustment or hardware calibration may be required.
3.2 Adjusting Hardware and Realigning the Window Sash
If gasket replacement does not fully resolve the leakage issue, the next step is to inspect the window hardware and sash alignment. Over time, hinges, locking points, and adjustment components can shift, reducing the pressure needed for effective sealing.
Adjust hinge positioning
Many modern integrated casement window systems allow three-dimensional hinge adjustment. Depending on the window design, adjustments may include vertical position, horizontal alignment, and closing pressure.
When adjusting hinges:
- Correct the sash height first if the window is uneven.
- Adjust the horizontal position to achieve proper frame alignment.
- Fine-tune compression settings to ensure even gasket contact.
After each adjustment, check the gap around all sides of the sash to confirm that the pressure is distributed evenly.
Calibrate locking points
Multi-point locking systems rely on balanced engagement between locking points and keep plates. If one side of the window closes tightly while another area remains loose, the locking points may require adjustment.
Repositioning the keep plates can help restore consistent closing pressure and improve air-tightness.
Confirm sash alignment
After hardware adjustment, verify that the sash sits evenly within the frame. Uneven alignment can place excessive stress on specific gasket areas and cause recurring seal problems.
A properly aligned sash should close smoothly and maintain uniform pressure around the entire perimeter.
4. Repair or Replace? A Decision Guide for Integrated Casement Window Systems
4.1 How to Evaluate Repair Costs and Remaining Window Lifespan
Deciding whether to repair or replace an integrated casement window depends on more than the immediate repair cost. Procurement teams should consider the window’s remaining service life, the impact on building energy performance, and the overall condition of the system.
A common evaluation approach is the 50% cost rule: if repair expenses, including parts and labor, approach or exceed half the cost of a comparable replacement unit, replacement may provide better long-term value — especially when the window is already near the end of its expected service life.
Key factors to consider include:
Remaining service life
High-quality integrated casement window systems are designed for long-term performance, but different components age at different rates. A window with worn gaskets or loose hardware may only require maintenance, while issues such as frame deformation or structural damage often justify replacement.
Energy performance impact
Poor sealing performance can increase air infiltration and reduce building energy efficiency. If a window no longer meets required air permeability standards, the additional heating or cooling load should be considered when comparing repair costs with replacement benefits.
Extent of the damage
The type of failure often determines the most practical solution:
- Repair is usually suitable for: worn gaskets, minor hardware adjustment issues, and localized sealing problems.
- Replacement may be necessary for: warped frames, severe sash deformation, failed glazing units, or repeated seal failures after repair.
4.2 Performance Standards and Checks After Repair
For commercial buildings, post-repair verification is an important step to ensure that the 일체형 여닫이 창 시스템 has regained proper performance and remains compliant with project requirements.
Air permeability testing
After significant seal repairs, verify that the window meets the required air leakage standards for the project. Testing methods such as EN 12207 or equivalent regional standards can help confirm whether the repaired system performs as expected.
Water tightness evaluation
If the original sealing problem involved water penetration, additional water resistance testing should be considered. This helps identify whether leakage was caused by gasket failure, drainage issues, or deeper installation problems.
Warranty and repair documentation
Before submitting a warranty claim, review the manufacturer’s warranty conditions carefully. Many warranties cover product defects but exclude issues caused by improper installation, unauthorized modifications, or normal component wear.
Keeping records of inspections, repair procedures, and photos of damaged components can help support warranty evaluations and future maintenance planning.
자주 묻는 질문
Q1: What is the most common reason an integrated casement window stops sealing properly after 3–5 years of use?
The most common causes are gasket compression loss and hardware misalignment. Over time, repeated opening, closing, and weather exposure can reduce sealing pressure, creating small gaps that allow air leakage.
Q2: Can hardware adjustment alone fix a casement window that leaks air at the corners?
Not always. Hardware adjustment can improve sash pressure, but it cannot repair damaged or hardened gaskets. Corner leaks usually require gasket inspection and replacement, followed by hardware adjustment if needed.
Q3: How do I know whether the seal failure is covered under the window system’s warranty?
Check whether the issue is caused by a product defect or normal wear. Frame deformation and hardware defects may be covered, while gasket aging, improper installation, or maintenance-related issues are often excluded.
Q4: How can I tell if my integrated casement window has a sealing problem?
Common signs include drafts, uneven sash movement, visible gaps, condensation near the frame, and increased heating or cooling costs. A smoke test or professional inspection can help confirm air leakage.
Q5: How often should integrated casement window gaskets be replaced?
Gasket lifespan depends on material quality, climate conditions, and maintenance. Regular inspections are recommended, especially for windows exposed to strong sunlight, coastal air, or frequent temperature changes.
Q6: Should I repair or replace an integrated casement window with seal failure?
Repair is usually suitable for worn gaskets or minor hardware issues. Replacement may be necessary if the frame is damaged, the window repeatedly fails after repairs, or repair costs approach replacement costs.
결론
Seal issues in an integrated casement window can usually be resolved through a structured approach: inspect the gasket, check hardware alignment, and assess the frame condition if problems continue. In many cases, replacing worn seals and adjusting hardware can restore performance without replacing the entire window system.
For long-term building performance, regular inspections and preventive maintenance help reduce unexpected repair costs, maintain air-tightness, and extend service life. When replacement is required, choosing a reliable integrated casement window system with durable gaskets, precise hardware, and tested sealing performance can provide better lifecycle value.
문의하기 준한 윈도우 to discuss customized window solutions and find the right sealing and performance options for your project.